Search Bread + Butter

Thursday, April 30, 2009

Tuna Avocado Dip


I can imagine your faces are you ponder the title of this post. Tuna avocado...WHAT?! Yes...and it's really good. Not a strong tuna taste or aroma. Surprisingly, avocado is a nice substitute to mayo.

You can replace tuna with your prefer "meat" like chicken or some of the kind of seafood.


Tuna Avocado Dip

1 can tuna in oil
1 medium ripe avocado (pitted and lightly mashed)
1 Tbsp lemon juice
salt & pepper to season


Drain the tuna of most, but not all, of the oil. Mix all ingredients together.

Serve with slices of french bread or crackers. You can even spread this on a sandwich.

Wednesday, April 29, 2009

Spinach Wontons


I was trying to figure out what to do with some leftover egg roll wrappers I had in the fridge. Searching high and low in the ol' refrigerator, I spot some onion, lemon juice, sour cream. Open the freezer...frozen spinach. Confused look on my face, then the light bulb moment. Ting!!! Wontons!!! Then I remembered Greg from SippitySup had done something similar with his pea puree, so that got me thinking. I can take my spinach dip recipe and make it as a filling for wontons. The only thing I left out was the water chestnuts, which is completely optionalfor this. Plus I didn't have any on hand

I did baked these. The nice thing about baking them is that you can do it in large batches compared to deep-frying them. They had the crispy edges of the fried version and a slight softness the soup kind. I had also made a dipping sauce to go with this, but totally forgot to take a pic of it. But it was good, too. A nice mild salty-tang and of soy sauce color, if that would be of any help.

You can deep-fry these in the traditional way to get that bubbly wonton look everyone is famliar with.


Spinach Wontons

1 small box frozen spinach (defrosted & chopped)
1/4 medium onion (diced)
3 Tbsp Sour cream
20 wonton wrapper
1 garlic clove (minced)
1/3 c grated romano cheese (plus extra)
1/3 water chestnuts (chopped - optional)
Salt and pepper to season.

Optional:
egg wash (1 egg beaten with 2 Tbsp water)

Preheat oven 400˚F

Make sure to drain all the excess water from the spinach. In a pan, heat some oil and saute the garlic for 30 sec. Then add the onions. Cook tossing occasionally until they are tender and translucent. Next, add the spinach and the optional water chestnuts. Season with salt and pepper. Toss again for 2-3 min.

Place the spinach mixture in a bowl and add the sour cream. Mix Thoroughly.

Take a wonton wrapper and place a dollop of the spinach mixture in the middle.

Wet one corner and the two adjoining sides of the wrapper with the eggwash and fold into a triangle. Fold into a triange shape. Press firmly to seal.

You can leave it in the triangle shape or make it into the tortellini shape. Baste the wontons in the egg wash or olive oil.

Place on a lightly greased baking sheet. (This will keep the wontons from sticking) Sprinkle some of the extra romano cheese on top of the wontons. Bake for 20-25min.


Dipping Sauce:

2 Tbsp soy sauce
2 Tbsp rice wine vinegar
1 Tbsp lemon juice

Combine all three ingredients.


You may add this to some boiling broth to make into wonton soup. Just omit the egg wash and crimp the edges together firmly.


Tuesday, April 28, 2009

Pinoy Style Fried Rice (aka Garlic Fried Rice)


Garlic fried rice is the Filipino version of the traditional fried rice found in Chinese cuisine. No carrots. No peas or chicken. Just garlic and little bit of margarine and an optional scrambled egg mixed in.

This dish holds a very special place in my heart because it's the very first thing I ever learned how to cook. I was probably in the 4th or 5th grade then. Can you imagine a ten-year-old alone in the kitchen? And I wasn't making toast. Never had a home economics class either. It was from watching my mom cook this over and over that I learned to make it myself. I remember I wanted to surprise my her with a nice meal when she got home. I pretended that I had my own restaurant. On the menu was garlic fried rice and slices of pan-fried spam. (Filipinos love that spam!!) I remember printing out little menus and drawing fancy borders on them then putting it in a pee chee folder. My restaurant then was called J & J Restaurant. The other "J" being my mom. It's a simple dish and the Filipino way of comfort food.

The rice. No Asian household is without a rice cooker. It's a must and very essential. To cook rice over the stove, click here. I'd tell you myself, but I've never cooked it over on stove pot. Except maybe for Arroz Caldo. (Chicken Rice Soup) That will be for a future post.

If you've got left over white rice from your Chinese take-out, use that too. For the margarine in this recipe, I use Star Margarine. It's a product of the Philippines that's been around since the 1930s. I believe it's now sold in the Asian aisle of some super markets here in the US. Not just in the local Asian markets. It's really good on toasted pan de sal or sliced bread with sugar sprinkled over it. But you can use any margarine of you choosing.

The memories are flooding back. Now 15 years later, I'm still cooking it.


Garlic Fried Rice

1 Large Garlic cloves (sliced or minced)
3 c Cooked Rice (rough estimate)
2-3 Tbs Margarine
1 Tbs Oil (vegetable, olive or canola)
Salt to season
1 egg (beaten - optional)

Heat the oil in a large pan, pot or wok. Cook the garlic until they start to turn brown, then add in the rice. Toss constantly for a couple of minutes, then season with a little salt and add the margarine. Again tossing constantly

When the margarine has dissolved into the rice you can add the optional egg. Again toss for another minute or so or until egg is cooked, then serve.


If you feel like adding more garlic or margarine, go right ahead. You can eat this for breakfast (most Asian cultures eat fried rice for breakfast), lunch or dinner. Either alone, with a fried egg or a side dish of your choice. I usually like to eat this with a freshly diced tomato or my personal favorite some banana ketchup. More on that later. Yum!


Fried Rice on Foodista

Monday, April 27, 2009

Sweet & Sour "See"-Food


Who doesn't love Chinese food? In my every attempt to somewhat healthify whatever I eat, I made some Sweet and Sour "See"-Food. Get it? "See"-food. (insert brief pause. *crickets*) Because you see before you eat. Anyway, it's actually catfish and tiger prawns, but what the heck. Clever, eh?

Traditionally, the "meat" is covered in a tempura-like batter and deep-fried. But I used my usual breading procedure and baked it in the oven instead. It tastes like from a restaurant. Looks like it can be from a restaurant. My kitchen is my restaurant. My dining table is, well, my dining table sans lazy susan.

If you do want to go the more traditional route, you can use cube-chopped pork, beef or chicken. Deep-dry it with an all-purpose flour and cornstarch coating. It just so happens that I saw some fresh looking seafood at the market and went for it.

This is my entry to LK's (Healthy Delicious) Meat-Free Friday Roundup/

Btw, that's me holding the chopsticks. Not fun trying to snap the photos left-handed while trying to hold a piece of fish between two sticks. There's not much room for a tripod. LOL.


Sweet & Sour "See"-Food

Baked Catfish & Prawns:

1 large catfish fillet (cut to 2" pieces)
1/2 lb jumbo prawns (your choice of species - deveined and shelled)
2 Eggs
1/2 c Milk
4 Tbsp All-Purpose Four
1 1/2 c panko crumbs
Salt & Pepper to season


Sweet & Sour Sauce:

Sweet & Sour Sauce (my recipe click here)
1 red bell pepper (chopped)
1 yellow bell pepper (chopped)
1/2 small onion (quartered)
1 8oz can pineapple chucks w/juice


Note: the juice in the pineapple chucks will substitute for the juice that's called for in the original recipe. No need to extra.

Preheat oven 325˚F

In three separate containers: 1-all purpose flour. 2-eggs and milk beaten together (seasoned with a little salt. 3-panko crumbs

Before breading, season the fish and prawns with salt and pepper. Then coat each piece with the flour, egg, then panko. In that order. Place on a baking sheet or pan.

Bake for 30 min. Flip the fish and prawns half way through to get an even browning.

Saute the bell peppers and onions in a saucepan until peppers are slightly tender and the onions are limp and transparent. Season with salt and pepper. Set aside in a dish.

Cook the sweet and sour sauce in a large saucepan minus the pineapple juice.

Bring it to a simmer on low heat then add in the bell peppers, onions and pineapple chunks plus juice. Stir to combine.

When the fish and shrimp are done baking let them cool for 5-10 minutes before adding them to the sweet and sour sauce. Then gently stir them in coating each piece and mixing it with the bell peppers and onions.

Serve with a bowl of steamed or fried-rice.


Sunday, April 26, 2009

10 Fun Food Facts of the Day

It's time for another round of 10 fun food facts of the day. I love these. Enjoy!!


One -

The first soup was made of hippopotamus. The earliest archeological evidence for the consumption of soup dates back to 6000 BC and it was hippopotamus soup!

(Ummm...I wonder how that would taste like!!)


Two -
.007 calories are consumed while licking a stamp.

(Good thing I moved to using the sticker kind.)


Three -

Banana trees are not actually trees - they are giant herbs.


Four -

7-Up - invented in 1920 contained Lithium - the drug commonly prescribed now to sufferers of bi-polar disorder.

(Isn't that an ingredient for making batteries, too?)


Five -
The world's first chocolate candy was produced in 1828 by Dutch chocolate-maker Conrad J. Van Houten.

(I just had to add a chocolate fact to appease my craving.)


Six -
Coca-Cola was originally green.


Seven -
In the 1950’s a McDonald’s hamburger, fries, and coke had about 600 calories. Today you can get a quarter-pounder, super-sized fries, and a 42 oz coke along with 1550 calories

(I wanted to comment, but I couldn't think of anything)


Eight -
California's Frank Epperson invented the Popsicle in 1905 when he was 11-years-old

(Let's all give thanks to the man who gave us a beloved summertime treat.)


Nine -
Large doses of coffee can be lethal. Ten grams, or 100 cups over 4 hours, can kill the average human.


Ten -
The hamburger was invented in 1900 by Louis Lassen. He ground beef, broiled it, and served it between two pieces of toast

(Anyone heard of Louis Lunch in New Haven, CT. That's the place where it all began and it's still served the same way. Oh, if you go there...don't ever ask for ketchup in your burger. It's frowned upon. Seriously.)


Resources:
http://listverse.com/health/top-10-incredible-food-facts/
http://listverse.com/food/another-10-fascinating-food-facts/
http://www.nms.on.ca/Elementary/fun_food_facts.htm
http://learnsomethingnewtoday.us/2008/01/09/fun-food-facts/
http://www.bitoffun.com/fun_facts_food.htm

Saturday, April 25, 2009

Mushroom Avocado Quesadillas


I had an extra avocado, so I needed to do something with it. First thing that popped into my mind was a cheese quesadilla. But I didn't want to make guacamole out of it. That would have been a given. Though, as much as I love the dip form, I love more the freshly opened and eat with the spoon way.

This makes 2 quesadillas.


Mushroom Avocado Quesadillas

Whole Wheat Tortillas (6" sized)
Shredded Mild Cheddar Cheese
2 Large Portobello Mushroom caps (rough chopped)
1 medium sized tomato (diced)
1 ripe avocado (sliced)
1 Tbps Butter or margarine
3 Tbsp Olive Oil
Salt & Pepper to season
Shredded Monterrey Jack Cheese (optional)
Chopped cilantro (optional)


On medium heat, heat the oil and melt the butter. Once the oil is heated toss in the portabello slices. Cook them until tender and darker in color. Season with some salt and pepper.

Sandwich the cheese between two tortillas and in another pan (medium to high) heat the tortillas until the cheese is melted.

It'll take roughly 3-5 minutes for the cheese to melt and the tortilla to get slightly crisp. Flip the quesadilla and heat the other side for another 3-5 min.

Remove from the skillet and open the quesadilla. Add in the some of the portabellos, tomato, avocado and some of the optional cilantro.

Serve with a side of sour cream.

Note: Toss the avocado with some lemon juice to keep it from instantly turning brown.

Friday, April 24, 2009

Baked Zucchini Sticks & Coins


You know fried zucchini, right?? Well, meet its better looking cousin, baked zucchini. The crispity-crunchity crust and the soft veggie inside, no need to feel guilty after eating these.

For the marinara sauce, I omitted the onions from my original recipe as seen in my eggplant parmesan and added two teaspoons of sugar to give it a little sweetness.


Baked Zucchini Shticks

2 Large zucchinis (peeled)

3 Tbsp All-Purpose Flour
2 Eggs
1/3 milk
2 c Panko Crumbs
1 c Grated Parmesan

Preheat oven 400˚F

Have 3 separate dishes: One with the all-purpose flour. Second with the eggs and milk. Beat together. Third one with the panko and parmesan mixed. Set aide.

Cut the zucchini in either 1/2" thick sticks or in 1/4" thick coins. Lightly dust the pieces in all-purpose flour, then soak it into the egg mixture, finally covering it in the panko mix. Place on a lightly greased baking sheet or oven safe pan.

Baked for 30 min. Half way through give the zucchinis a quick turn or flip to let the other side crisp up.


Marinara Sauce:

1 8oz can tomato sauce
1 medium-sized tomato (diced and slightly mashed)
1 garlic clove (minced)
1 tsp dry basil
1 tsp dry parsley
1 tsp dry oregano
2 tsp sugar
Salt and pepper

In a sauce pan, heat some extra virgin olive oil and saute the garlic. Then add in diced tomatoes and stir letting the juices seep out. Add in tomato sauce. Season with basil, parsley, oregano and a nice pinch of salt and pepper. Cook to simmer. Turn off the heat and let cool completely and it will slightly become thick. Perfect for scooping. Makes about 1 cup.

Thursday, April 23, 2009

Pancake Crostini?


I really don't know what to call this one.

I had one of those Bisquick Shake & Pour pancake mixes in the cupboard. I wanted to try it out and actually almost forgot I had it. Tastes like a pancake from the box. I grew up in the read-to-eat generation of pancakes. Or we'd just go to IHOP or Denny's for some flapjacks. This was just a little experimentation and an excuse to use the pancake mix. Next time I'll make the pancakes from scratch with maybe some fresh fruit and a nice dollop of my maple butter. Yum!!!!

Anyway, it's just silver dollar sized pancake. Cooked them on a medium heat in a buttered pan. Put some leftover empanada filling and a tiny sprinkle of shredded mild cheddar cheese on top. Baked for 5 to 10 min in a 400˚F oven. I can't really say how many I made as I was snacking on them while I was still cooking them.

The pancakes get a bit toasted and the cheese is nice and melted. I guess this can be a version of the crostini or mini-tostada without the dressings. Any one else have better name ideas? Either way, these are cool appetizers for any party. If only I had some sour cream, this would be so much better. But it's a good start.

Wednesday, April 22, 2009

Site Update: Followers Box

I added a followers box on the monstrosity of a sidebar there. LOL. So if you'd like to follow me, if you aren't already via rss feeds, reader feeds or email, go on right ahead and click follow. I'd love to have you on board. The more the merrier I always say. =)


Side note: In my attempt to purchase a domain name I find out that breadplusbutter.com is already taken. Totally bummed!!!!

Greens with a drizzle of Honey-Mustard Vinaigrette


It's a lot of green and a little bit of whatever color canned tuna is. Doesn't matter. The vinaigrette makes up for all the green-ness in this dish. Maybe it's my way of being a little earth conscious on this Earth Day. See the connection there? Earth...green...vegetation...salad.

With the weather being summer hot early this week, I wasn't really in the mood to spend a whole lot of time in the kitchen, where the heat can definitely add up.

Sliced up some romaine hearts that I had gotten from the farmers market, cucumber (peeled), half an avocado, and added some the leftover tuna salad from the T.M.T. Drizzled over some of the sweet and tangy Honey-Mustard Vinaigrette and...viola! Dinner without the hassle. Give me a small bottle of Perrier and a couple of Samoas cookies for dessert to go along with this and I'm satisfied.

It's delicious, healthy and just right.


Honey Mustard Vinaigrette

1/3 c Extra Virgin Olive Oil
1 Tbsp Dijon Mustard
1 1/2 Tbsp Honey
Juice of one small lemon (roughly 2 Tbsp)
salt and pepper to season

Blend well and pour over on your favorite salad mix.

Tuesday, April 21, 2009

Gigi's Farmers Market


I love farmers markets. Just the abundance of fresh produce and local products. I'm all about helping the local economy.

The Americana at Brand is an upscale small outdoor mall with apartments located in Glendale, CA. If you've been to Los Angeles, you've probably be introduced to The Grove which is located next to the historic LA Farmers Market.

The Americana is the "sister" site of the Grove. Same developer, same style, but different stores and restaurants.

This past weekend they began something new. Glendale already has a farmers market on Thursdays. It seems like they were replicating the feel of what is at the Grove. (I figured as such) So, I was pleasantly surprised by the start of the new one called Gigi's Farmers Market. Who is Gigi? I did a little digging and found out that it is the name of the Americana developer's daughter.

I was able to sample some fresh made breads and some delectable asian pears, fresh fuji apples, oranges. There were handmade pottery and stitched market bags as well as fresh herbs and flowers. They offered some free tacos and fajitas courtesy of Frida Mexican Cuisine and cupcakes from Crumbs Bakeshop.


Two of the stalls in particular that I had visited that I would love to try more of their products.

Domenico's Artisanal Foods sold fresh pasta, sauces, pestos, read-to-go meals, tapenades. I sampled their sun-dried tomato pesto. It was nice and creamy. For those of you who been following this blog, know I'm a suck for a good pesto. This was more than good. They have also been featured in Bon Appetit Magazine, which was cool.


Gourmet Blends
sold some fine flavored balsamic vinegars and flavored olive oils. A small bottle would go for about $18 and a large bottle for about $35. I had sampled the Basil Garlic Parmesan Oil and the Asian Dipping Oil. But the one I really liked was the Raspberry Balsamic Vinegar. Wow. The fruit really stands out, so there's a sweet combination with the acidity of the vinegar. That would go really great in a nice vinaigrette.


Note to self: Next time bring more cash. At least I know what the market has to offer for my next visit.

It's little bit more swankier than the Thursday bunch. But there looked like a good turn out for the first day and a nice variety of locally made items as well. Plus I got a free tote bag. I'm a sucker for tote bags, too.

Gigi's Farmers Market. It's every Saturday from 10am-2pm on Caruso Way in Glendale, CA. I'll be coming back.

You can view more photos by clicking here

Monday, April 20, 2009

Baked Empanada


Empanadas are generally deep-fried. I still love those deep-fried versions, but this time around I opted for a slightly healthier way of making them. Hence, comes my friend, the oven.

It'll still has that crisp crust with a touch of chewyness and without the oil. Very delish and goes well with a salad.


Empanada Dough

2 c Cake Flour
2 Large Eggs
1/4 tsp Salt
1/2 c Butter or margarine (softened and cut into pieces)

Combine all ingredients together until its one large mass. You can mix these ingredients together in the food processor to make it go faster.

If mixing my hand, put the flour in a medium sized mixing bowl. Add all the ingredients and mix until it almost forms into a dough blob.

Knead the dough a few times, form into a ball and wrap it tight in saran wrap. Chill in the fridge for at least 30min.


Filling:


1/2 lb ground pork
1/2 lb ground chicken
1 garlic clove (minced)
1/2 medium onion (small diced)
Salt & Pepper to season

Optional:
Sun-dried tomatoes
potatoes
raisins


In a skillet, heat some oil. When the oil is hot, add in the garlic and onions. Cook the onion until translucent. Then add the ground pork and chicken and any of the optional ingredients.


Putting it all together:


Preheat oven 375˚F

Have an egg wash on hand (1 egg beaten with 2 Tbsp of water) for sealing the dough a coating before baking.

Remove the dough from the fridge. Unwrap the dough and place on a flat well-floured surface. Using a rolling pin, roll out the dough - 1/8" thick (like a pie crust) Cut out the circles using a cookie cutter or some other round item. This will make roughly 12 rounds. You'll want them around 4 inches in diameter.

Place a small amount of filling on one side. Brush some of the egg wash on the edges of the unused side, then fold over into a half-moon shape. Crimp the edges to your desired crimp "design" and place on a lightly greased baking sheet, if not using a silpat. Brush some of the egg wash over the top of each empanada.

Bake these for roughly 25 min or until the the crust has a goldben brown color.


Note: Keep in mind that dough has the tendency to dry out, so place a damp cloth or paper towel over the finished pieces and unused dough to keep them moist.


Sunday, April 19, 2009

T.M.T.


What you may ask is a T.M.T.? It is a Tuna Melt Tomato. They could be just called Stuffed Tomatoes, but T.M.T. sounds WAY cooler.

A few days ago Greg from Sippity Sup had announced a tomato contest, I figured why not? So, here's my entry. Besides, I felt like eating something relatively light after that feast from last week. =)


Tuna Melt Tomatoes


4 Medium sized tomatoes
1 5oz can tuna (in oil)
2 tsp Mayo
2 tsp Sweet Relish
1 C Panko Crumbs
Shredded Mild Cheddar
A few pieces of romaine lettuce.


Preheat the oven 350˚F.

Cut the tops off of the tomatoes. Then carefully cut and scoop out the ribs and seeds, making it into a hollow bowl. Set Aside.

Drain most, but not all of the oil from the tuna. Mix in Mayo, relish and panko crumbs. Blend thoroughly.

Divide the tuna mixture evenly among the tomatoes and top with some cheddar cheese.

Drizzle a little olive oil in a baking pan and place the tomatoes over.

Bake for 20 to 25 min. Serve immediately. Place the tomatoes over the lettuce leaves on a dish

The best way to enjoy this is to place some of the tuna and tomato in the lettuce leaf and eat it like a wrap.


.

Saturday, April 18, 2009

A few food related things and an award

I figured I'd let you all digest that scrumptious food feast from the week. Just a few small things today. How about some cookies to snack on while you muse the rest of today's post? Here's my favorite. Can you name it?


So, I officially entered the Pillsbury Bake-off. Entered 3 recipes. The 100 chosen contestants will be announced in September. Fingers crossed. I'll keep you posted. It turns out that there's no limit as to how many recipes you enter. If I had known that earlier I would have entered more. I still got a tiny bit of time. But I don't want to rush a recipe, just for the sake of entering. There's always next year, too. So for now, it'll just be three.

Also, My Shrimpy Love photo made it onto the Photograzing at Serious Eats yesterday. Sweet!!!

Oh, and I reverted the comment page back to the full separate page commenting. There's seems to be little buggy that some people aren't able to post comments when the comment form is below the post. Boo on the blogspot server, but I still love ya.

Next, I added a little measurement converter. I saw this at Sophies FoodFiles and thought it was a pretty neat idea. It'll be a great help for those who have a hard time converting tablespoons from ounces and so on. It'll make cooking and baking lives a bit easier I think.

Third, I received a little surprise in the mail a few days ago. It was the moo minicards I had ordered last week courtesy of Food Buzz.

These cute little mini business-like cards are a hand little way to promote your business, hobbies and yourself. I had heard about moo.com before from friends and colleagues who have used it for their own. It's really handy compared to carrying around the regular sized business cards. Then when Food Buzz offered to have our first order on them for the Featured Publishers, I was in heaven. The pictures were already selected (32 of them. 100 cards total.) The only thing we had to do was fill out the info we wanted on them.

Can't wait to stand handing them out to people. Nice promotional idea.

Thanks Food Buzz!!


Lastly, the other day I was given a lovely friend award by Kelly at Evil Shenanigans (She ain't evil, I promise!) I send a special shout-out to her today.


Along with the award comes the following description:
"These blogs are exceedingly charming. These kind bloggers aim to find and be friends. They are not interested in self-aggrandizement. Our hope is that when the ribbons of these prizes are cut, even more friendships are propagated.”

It also says : "Please give more attention to these writers. Deliver this award to eight bloggers who must choose eight more and include this cleverly-written text into the body of their award."

I'm honored, especially in the short time since Bread + Butter began, that I'm able to be among so many wonderful people who love food as much as me. So, it's really hard to choose just 8 when there's so many deserving of this award. I wish to give it to everyone I follow and who follow me, I really do. The recipients mentioned below are just a few of those who've been really awesome in spreading the food love. In no particular order:

Dawn at Vanilla Sugar
Robert-Gilles at Shizuoka Gourmet
DoggyBloggy at ChezWhat?
Pam at For The Love of Cooking
Oyster Culture at Oyster Food & Culture
Tangled Noodle
Eric at Eric Rivera's Cooking Blog
Chrystal and Amir at The Duo Dishes

There are so many more food blogs that I read everyday. You can check some of them out on the Key Ingredient blogroll on the sidebar. (I'm still waiting to get on that Foodie Blogroll as well - *wink wink*)

It's hard for me to express how I truly appreciate all of you who have visited and continue to do so on this ever-growing little blog of mine. It makes doing this everyday even more fun. Thank you so very much!!

Happy eating!!!

Friday, April 17, 2009

Triple Berry Mint Sorbet

Course #4 - Dessert: Part Deux

The after-after party. This is where everything begins to calm down.

To finish off the filling meal, I wanted something a little light and refreshing. The only thing that came to mind was a simple sorbet. I made this the day before using frozen fruit (strawberries, rasberries, blackberries). Fresh ones would do as well.


Triple Berry Mint Sorbet

Simple Syrup:
2c water
1c sugar

12oz fresh berries or 1 small bag frozen Mixed Berries
2 Tbsp Mint (rough chopped)
2 Tbsp Lemon Juice

In a saucepan, heat the water and sugar. Bring to a boil. Once the sugar has dissolved, turn off the heat and let it cool completely.

In a food process or blender pulverize the fruit into a near slush. Add in lemon juice and mint. Blend thoroughly. Slowly add in the simple syrup mixture and mix well once again. Pour into a large enough container and place into the freezer. Let it set for at least 4-5 hours. Stir every few hours to keep from hardening too much. If it does become to hard, place it into the fridge for 15 min. Then Serve.

Garnish with some fruit and mint leaves. It's got a nice slush/smooth texture to it with a subtle minty fresh flavor. This is perfect on a hot day.

If you've got an ice cream maker, go ahead and use it for this, too.


Thursday, April 16, 2009

Almond Toffee Bars

Course #4 - Dessert: Part One.

Now, it's time for the after-party. Woo...

I remember tasting something similar to this at Cakery Bakery in La Canada, CA. Though it didn't have any toffee. I fell in love with it from the moment I laid eyes on them. Yes, love at first sight can happen with food.

Rather than driving there and paying $.85 for a small piece, I tried my hand on making my own batch. I totally took a wild guess as to what the ingredients might be. Dissecting it as I took a bite. I had a good feeling as to what they may be. Bakeries don't usually divulge their secrets unless you're really super-duper nice and do favors for them or you work there.

I made this with a graham cracker base similar to making a pie crust and added the toffee bits.


Almond Toffee Bars


Graham Cracker Base:


22 Whole Honey Graham Crackers (crushed)
1/4 c sugar
1/2 c unsalted butter or margarine (1 stick - softened)
1 1/2 Tbsp Cinnamon

Preheat oven 350˚F

Combine ingredients thoroughly together in a bowl and mix until it can easily be molded in your hand. Place the mixture into a lightly greased 13x9 baking pan. Press firmly into a leveled layer.

Bake for 8-10min and let cool. The crust will harden after cooling.


Almond Toffee Filling:

7 oz Almond paste (mashed into bits for easier mixing)
3/4 c unsalted butter or margarine
1 1/2 Tbsp Vanilla
2 Eggs
4 Tbsp Sugar

1 c sliced almonds
1/2 c toffee bits

Combine the ingredients together in a bowl until the mixture is of a creamy consistency.


Pour the mixture over the graham cracker base. Spread into an even layer then sprinkle the sliced almonds and toffee bits on top.

Bake for 30 min. The top should have a caramel color to it. Let it cool completely before cutting or else graham cracker will slightly crumble.

Cut into desired sizes and enjoy.

Wednesday, April 15, 2009

Shrimpy Love


Course #3 - Main Dish

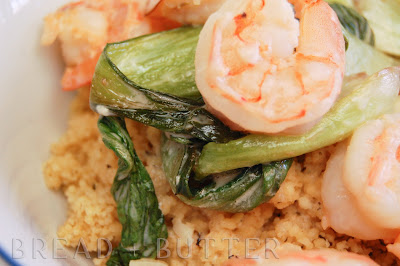
I had no idea what title to give this. It's either the current one or shrimp in cream sauce with sauteed baby bok choy over garlic and olive oil couscous. Right. That wouldn't fit with the limited space given.

I hope you enjoyed the coming attractions as now I give you the feature presentation.

This recipe will serve 2-4 people. (Depending on how hungry one person is)


Shrimp in Cream Sauce
1 Lb Shrimp - deveined and shelled (you may add more)
1 Garlic clove - minced
2 Tbs Butter or margarine
3 Tbs Lemon Juice
1 8oz can Evaporated Milk.

In a sauce pan, melt the butter and heat garlic. Add in shrimp. Stir constantly until they turn a nice white-pink color.

When the shrimp is cooked, add in lemon juice and evaporated milk. Stir occasionally and bring to s slow simmer.


Garlic and olive oil Couscous

1 box Casbah brand flavored couscous.

Rather than cooking it with water, I used 1 1/2 c chicken stock to add a little more flavor.

Bring the stock to a boil before adding the couscous. It'll cook in about 5 min. Fluff with a fork to break it apart before serving.


Sauteed Baby Bok choy

1 bundle baby bok choy (per person)
2 Tbsp Soy sauce
1 Tbsp Olive oil
Salt and Pepper to season

Heat the oil in a saute pan and add in the baby bok choy. Season lightly with some salt and pepper, then add in soy sauce. Cook for roughly 3-5 min.


Putting it all together: Take a bowl or plate and place a nice helping of couscous as the base. Top with some of the sauteed baby bok choy and shrimp with cream sauce.

The sauce gets absorbed by the couscous giving it a nice lemon-garlic flavor.

Tuesday, April 14, 2009

Sweet Potato Cakes

Course #2 - The Appetizer

This is a little something my mom had made up. The first time I tried it, I was bit hesitant, but I ended up liking it so much that I decided to add it to our meal. You'd think it's a cake or cookie or some other baked goodie, yet it's a sweet potato and a handy snack as well.


Sweet Potato Cakes

1 large white sweet potato
1/4 c sugar
2 Tbsp Butter
2 c Panko crumbs

Preheat oven 350˚F

Cut the sweet potato into medium portions and place into a large pot. Add in enough water, just enough to cover it and bring to a boil. When the water is boiling turn down the heat and let it simmer for roughly 15 min or until fully cooked. It's like making mashed potatoes. To test if the potato is done, poke it with a fork or knife and it should easily pierce through with no little to no resistance.

When the potatoes are ready, dump the water out and let cool for 5-10 min.

Remove the skins then mash the the potato. You may use a food processor or potato ricer. Add in the sugar and butter. Mix thoroughly. Next divide into 6 equal portions and shape into palm-sized cookie forms.

Then coat the potato cookies with the panko crumbs. Place on baking sheet.

Bake for roughly 45 min or until of a golden hash-brown color.

It will have a nice crispy crust and soft chewy center.


Monday, April 13, 2009

Baked Inside-Out Chicken Sliders


One of the wonderful things when a special holiday comes up is that you get to cook as much as you want. I planned a 5 course Easter feast. Well, it's actually 4, but there were 5 dishes all together. Two of them were desserts.


Course #1 - Pre-Appetizer


Baked Inside-Out Chicken Sliders


4 chicken tenders or 12oz ground chicken
1 Tbsp Paprika
1 Tbsp Dry Basil
cheese slices divided into 4 smaller squares.
Sourdough mini rolls (sliced) or mini burger buns
pieces of butter lettuce
condiments (optional) - I used my special sandwich spread
Salt and pepper to season

Preheat oven 350˚F

Grind chicken tenders in a food processor.

Mix in paprika and basil into ground chicken. Add in a pinch of salt and pepper to season and divide into 4 palm-sized patty rounds. Take one round and place two square pieces of cheese in the center. Top with another patty round and seal the edges well to trap in the cheese.

note: ground chicken isn't as firm as beef, so it may stick to your fingers.

Place on a greased baking sheet. Use a little olive oil or cooking spray.

Bake for 15-20min on the middle rack. You'll hear it sizzle in the oven like it's on a grill.

5 min before removing the chicken, toast the buns in the oven over a piece of foil. Remove bread and chicken. Spread on mayo or any condiment you'd like along with the lettuce pieces and enjoy. This makes two sliders.

Sunday, April 12, 2009

Peep S'mores


Easter. Bunnies. Chocolate. Eggs. One of my favorite things about this time of season is the abundance of Peeps. These little marshmallow goodies covered in a sugar coating of the classic yellow, pink, purple or blue. Here's a fun way to take a classic campfire snack and give it a little flair for the Easter holiday. It's a nice treat for the kiddies, too.

I ended up getting a bit of a sugar high after eating a few of them. But they were soooo good. The chocolate oozing from the side. Besides, it's only once a year and I've been good on my Lenten sacrifices. I had tried heating the marshmallows in the oven, but it took long and burnt the graham cracker underneath. I didn't want to do the conventional way by heating them over a fire. I still wanted to keep the sugar coating of the peep in tact. My only other option was the microwave. The peep gets hot enough that when you place the chocolate on top, it instantly begins to melt.

It's finger-lickin' good!


Peep S'mores


Peeps (any color/bird or rabbit)
Hershey's milk chocolate bar (divided into squares)
Honey Graham Cracker (halved)


Take one half of the graham cracker and place a peep on top.

Microwave for 20 seconds in two 10-second intervals. The peep will puff up like a balloon, but won't explode.

Remove the microwave and add a nice chunk of chocolate on top then place the other half of the graham cracker. The heat from peep will instantly melt the chocolate into liquid goo.

Then enjoy.

Warning: This snack will get messy, so have plenty of napkins on hand.


Saturday, April 11, 2009

Film Shoot Catering

One of the best thing about what I do is being able to work on various productions and meeting different people. What I love more is when I'm working on the set in a studio or on location. What makes it all worth-while is the catering and craft service. Sure, there's the whole creativity thing, but really...it's all about the food. Shhh...don't tell anyone I said that. haha... My most recent project was producing a short film for a good friend of mine. I won't go into specifics on what that entails, but the main thing is to make sure that all the uber-important stuff gets done. Producers do the dirty work no one wants to do.

Anyway...call time was early morning, so that meant breakfast. I didn't take a picture of it as it was only a bagel with some plain shmear from Noah's Bagels. Nothing really special there. It was a cinnamon sugar one for anyone interested. I would have rather made my own really, which I will do very soon.

The real treat was lunch. A lot of small productions will usually order food from restaurants or hire a caterer to prepare the food. One cardinal rule on any set is to make sure the cast and crew are well fed. Bad food = cranky people.

I need to give a special shoutout to Tiffany Ingle, the director's lovely wife, who was responsible for preparing the very delish lunch we had that day.

On my plate:
Some greens and cherry tomatoes with a nice vinaigrette
Pesto with penne rigate and some shredded parm (I'm a sucker for anything pesto)
Some sauteed yellow bell peppers and zucchini (how did she know I loved zucchini?)

There was some chicken too, but I had given up meat for lent and with it being so close to Easter, I didn't want to blow it. I really wanted to try it though. That was a bummer on my part. But I bet it was delish, too.

I did have one and half servings. A girl who loves her food has got to eat. Standing and being active all morning makes one really hungry. Btw... don't mind the fork sneaking into the shot below. My fork was eager to gets its fingers into that pasta.


For dessert, she had made some scrumptious chocolate chip cookies. They were thin and crisp with chocolate chunks. I probably ate half a dozen of 'em. I didn't count, but they were sooooo good.


Another film down, however many more to go. On to the next!!!
Blog Widget by LinkWithin
Powered By Blogger